Wednesday, July 4, 2012

For your 4th of July picnic!

If you're pondering what to take to your 4th of July picnic with friends and family, here's a quick recipe  that will bring rave reviews and assure that you will return home with an empty bowl!

Black bean & Black-eyed Pea Salsa

2 cans black beans, drained (I use organic when I can find them)
2 cans black-eyed peas, drained (ditto)
2 cans Mexi-corn, drained
1 can Ro-tel tomatoes with chiles (I use medium heat)
1 Vidalia or red onion, medium dice
1 green pepper, cored and diced
Add a freshly diced tomato if you like!

Drain and wash beans and peas.  In a large bowl, mix beans, peas, corn, Ro-tel, diced onion, green pepper and tomato together.  Prepare salsa dressing.

1/2 cup red wine vinegar
1 Tablespoon balsamic vinegar
1 teaspoon salt
1/2 teaspoon pepper
1 Tablespoon Dijon mustard (I like grainy Dijon in this recipe)
1/4 teaspoon sugar
1/4 teaspoon dried oregano
1/2 cup olive oil or good vegetable oil

Whisk the dressing ingredients together and pour over salsa mix.

Serve with sturdy chips (Fritos for dipping or Baked Scoops)!  Everyone loves this dip!!


Drained beans and peas, corn and Ro-tel in a large bowl.


I needed a green pepper!  Lucky for me, I stepped outside to my son's organic garden and picked this one right off the vine.


Fresh and delicious!!


Almost done...all the veggies in one bowl.


Whisk the dressing in a measuring cup and pour over the salsa mix.


Bring on the chips!!  This is so fresh and good!!


Now you have a quick and fabulous dish to share on a hot summer day!!  Whatever your plans are for the 4th, have a safe and fun Wednesday!!

Happy Birthday America!!

Sunday, June 24, 2012

a three bunny day

Since I've returned to work full-time and taken a hiatus from baking cupcakes, I've started reintroducing  things to my daily schedule.  It goes without saying that baking is often a part of my day and lately I've added walking as well.

This morning I was walking the hill-filled path (roughly 3 miles) in a nearby neighborhood at about 7:15 a.m.  I have to get up early to exercise to be able to enjoy the cool and quiet of the morning.   I look at the architecture, yards and gardens and wave to people out walking their dogs or driving by.  I usually see lots of chipmunks and squirrels, cardinals and bluebirds and every so often a hawk will screech loudly and fly overhead, eventually perching in a tall pine tree.

But today on my walk,  I saw three bunnies.  They were in different yards along the way... one was nibbling his breakfast, the second was sitting in the shade and the third was hopping down a driveway.  

Seeing them reminded me that a  few years ago, a family of rabbits took residence in my yard and it was not unusual to see several of varying sizes at different places...some in the vinca, some by the apple trees, some making their way to the shelter of the azalea bushes.

At the time, I had black-eyed susans lining the flower beds in front of our house.  The plants grew next to the sidewalk and there were hundreds of beautiful flowers.  I had planted them as a remembrance of my home state of Maryland and was thrilled that they were thriving in the Georgia clay.  In the fall I would leave the dried flowers in place after their season had come and gone and watch the small birds land on the centers and eat the seeds that remained.  The goldfinches seemed to enjoy them the most.

This particular summer,  I watched through my kitchen window, not the birds eat the black-eyed susans, but the rabbits!  They would delicately bend the stems to the ground and eat all the yellow and black flowers, leaving only stalks behind.  It took weeks for them to finish off all the blossoms, and in the end,  I had a garden full of sticks and a family of contented, well-fed rabbits.

The black-eyed susans didn't return to my flower bed until this year.  Some dormant seed decided it was time to try again and I now have 2 small plants that have volunteered to take up space next to the sidewalk.  I have seen rabbits in my yard recently and wonder if they will make a meal of the flowers.  As much as I love the flowers, it's really OK with me if they do.

**********

Now to share something that I think you will enjoy eating.  Since it's not black-eyed susan season, but blueberry season, here is a recipe for Blueberry Crumble.  I made one this morning and, believe it or not, waited until after dinner to try it.  This one was not for the rabbits.

Blueberry Crumble

Preheat the oven to 375.

Mix 6 cups of blueberries, 1/2 cup sugar, 2 teaspoons of lemon juice and 5 teaspoons cornstarch together.  Mix until the blueberries are well coated and pour into an 8-inch square baking dish.


6 cups of freshly washed and drained blueberries.


Blueberries, sugar, lemon juice and cornstarch.


I used a pretty baking dish instead of an 8-inch square!

For the crumble topping, mix 1 1/2 sticks of softened, unsalted butter with 1/2 cup light brown sugar.  Use a mixer to make the batter light and fluffy.  Add the butter mixture to 2 cups all-purpose flour and 1 teaspoon coarse salt.  Mix this with your fingers until large pieces come together.  Spread this over the blueberry mixture.


Unsalted butter and brown sugar added to flour and salt.


 Blueberries peaking out from under the crumble topping.


The blueberries are completely covered here!


The crumble baked at 375 for 40 to 50 minutes.  Be sure it's bubbling when you take it out!


In a dessert dish, waiting for the final topping.


Perfection.

The blueberry crumble is delicious hot or cold.  Today I topped it with vanilla frozen yogurt, but you could use ice cream or whipped cream.  This is so, so good!!

My wish for you today is that you find something that calms and relaxes the mind (for me walking and looking at nature) and feeds the soul (baking).

May you have a three bunny day!!

Thursday, February 16, 2012

Little Jars

My daughter met a wonderful young man, Graham,  during her first year in college at Davidson.  He has become a lifelong friend of our entire family...through my daughter changing schools, college graduations and  crazy jobs that have taken both of them in many directions around the country.  On the rare occasion that Graham travels through Atlanta, he stops for a visit and bakes the most wonderful desserts for us...mostly gourmet cheesecake.  He brings all the ingredients and just "borrows" our kitchen for a while.  We sit and talk while he crafts his confections.

At the end of one visit, I misspoke and said that cheesecake "wasn't my favorite" thing.  Graham was momentarily crushed as he took great joy in creating cheesecake delicacies for us.  I immediately corrected myself and said that it wasn't my favorite thing to make...eating it was a totally different story.  I've always found making cheesecake to be a little tedious and the water bath a little challenging...cheesecake falls into my almost never category.  I totally rely on Graham to make my cheesecake!!

This year for Valentine's Day I stepped out of my comfort zone and made cheesecake for the wonderful group of women I work with everyday.  Not the "Graham" variety of cheesecake...I stuck with simple and small (a reference to my last blog entry) because I wanted to make something delicious, decadent, easily transportable and single-serving sized.  Success!!  The fact that it is also pretty is a bonus!!

I give all the credit to Martha Stewart for this one.  The only "original" part of the recipe is the topping I selected...and I give Kroger all the credit for that.  I used their tart cherry-white peach pie filling.  It adds a bit of tanginess to the creamy-sweet cheesecake.  You can use whatever topping you like.  Cover it up  with a traditional graham cracker crumb blend and the jars are good to go!!

Little Cheesecake Jars

8 oz. cream cheese, softened to room temp
1/2 cup sugar
3 large eggs, room temp
4 oz. sour cream
1 Tablespoon fresh lemon juice
salt
Your choice of fruit topping
1/2 cup graham cracker crumbs
1 1/2 Tablespoons melted unsalted butter

Preheat the oven to 325.

Beat cream cheese on medium speed until smooth.  Add sugar and beat on medium for 3 minutes.

On low speed, add eggs, one at a time, beating well after each addition.

Add sour cream, lemon juice and 1/4 teaspoon salt.  Beat for 3 minutes on medium speed.

Divide batter among six 6-oz canning jars filling them 2/3 full.  I transferred my batter to a measuring cup for ease of pouring.

Transfer jars to a deep baking dish.  I used a roasting pan since I had doubled the recipe and had 12 jars. Add enough boiling water to the dish to reach halfway up the sides of the jars.  Cover the dish with foil; cut 8 slits into the top of the foil to vent.  Bake until set in center, about 25 minutes.

Let cool and then refrigerate overnight to set.

Top the cheesecake with your choice of fruit topping...although ganache topping and then graham cracker crumbs would be amazing!!  Mmmm...I might have to try it.  About a Tablespoon and a half should do it.

Mix graham cracker crumbs with melted butter.  Bake on a parchment-lined baking sheet for 10 minutes.  Let cool and then top each cheesecake jar with a heaping Tablespoon.  Tap lightly and then cover!


Cheesecake topped with tart cherry-white peach pie filling.


Graham crackers on top.  So delicious!!  You'll love this recipe!

These little jars fit the bill for my office Valentine's remembrance!  They store in the fridge for 4 days and are as pretty to look at as they are yummy to eat!!

It was a little thing...but it gave me a big smile!!  You'll smile too!!

Friday, February 3, 2012

the little things

I have decided, being the blogger who is anti-resolutions, that for a little while at least, I am going to focus on the little things.

It seems that my "big picture" is a bit overwhelming for the moment, so my attention will settle on small successes, small goals and small, but lovely pleasures.

In keeping with this theme, I got in the kitchen yesterday and baked something wonderful that I want to share with you!  Falling in the category of small pleasures, I am, like many of you, a follower of Pinterest.  Having so little free time, my Pinterest "addiction" has been limited to food and home decor.  Since baking is my absolute passion, I spend more time looking at creative food ideas...beautiful icings, delicate cake stands...you know me...anything sweet.

I saw this recipe, knew that I had all the ingredients on hand and got started.  Big Soft Ginger Cookies translated to sugar and spice and comfort food.  Thank you all recipes.com.  This one is a total winner!!

Big Soft Ginger Cookies

2 1/4 cups all-purpose flour
2 teaspoons ground ginger
1 teaspoon baking soda
3/4 teaspoon ground cinnamon
1/2 teaspoon ground cloves
1/4 teaspoon salt
3/4 cup margarine, softened (*I used unsalted butter)
1 cup granulated white sugar
1 egg
1 tablespoon water
1/4 cup molasses
2 tablespoons white sugar

Preheat the oven to 350.  Sift together the flour, ginger, baking soda, cinnamon, cloves and salt.  Set aside.

In a large bowl, cream together the margarine and 1 cup sugar until light and fluffy.  Beat in the egg, then stir in the water and molasses.  Gradually stir the sifted ingredients into the molasses mixture.  Shape the dough into walnut sized balls and roll them in the remaining 2 tablespoons of sugar.  Place the cookies 2 inches apart onto an ungreased cookie sheet and flatten slightly.

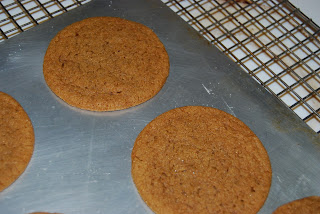
Bake for 8 to 10 minutes in the preheated oven.  Allow cookies to cool on baking sheet for 5 minutes before removing to a wire rack to cool completely.  Store in an airtight container.


Rolling the dough...not as sticky as it looks, but you will have to wash your hands after a few.  I use a small ice cream scoop to form the balls.


Rolled in sugar, ready to flatten and put in the oven.


The fragrance is amazing...hot out of the oven!!


Ready to share with friends and family.  A cup of hot tea is calling my name!!

My advice for the weekend is, do something nice for yourself.  Call a good friend, read, paint, bake...take a nap, tackle a project...anything that will make you say, "That was good!!" Keep it simple, keep it small...little things. 

I'm going to keep working on that..little by little.

Monday, January 9, 2012

Try it!!

During the holiday season, I was given an extra gift this year.  A son who was willing to prepare both our Thanksgiving and Christmas dinners!!  He is a great young man with a variety of interests...rock climbing, music, anything outdoors...and luckily, talent in the kitchen!!

This is Lex, doing what he loves the most...and making his mom very nervous!!


At Thanksgiving he asked me for dinner suggestions and together we worked on a menu based on an article featuring Chef Scott Peacock in the December issue of Better Homes and Gardens.  I made biscuits, orange-cranberry sauce,  pumpkin pie and Lex did all the rest which included herb-and-garlic crusted pork roast, scalloped potatoes, salad and the surprise winner of the night,  caramelized Brussels sprouts with lemon.  Yes that's right, Brussels sprouts.

I can't remember a time when I was ever served brussels sprouts as a child or cooked them as an adult.  The beautiful photos in the magazine article made us all want to give it a try, so we did...and now we're hooked.

Here's the recipe, taken straight from BH&G.

Caramelized Brussels Sprouts with Lemon
Prep time 15 min, Cook time 6 min

1/4 cup extra virgin olive oil
4 cups Brussels sprouts, trimmed and halved lengthwise
2 Tbsp. water
Juice of one lemon half, about 1 Tbsp.

In a 12-inch nonstick skillet heat 3 tablespoons of the olive oil over medium heat.  Arrange Brussels sprouts in a single layer, cut sides down.  Drizzle with remaining olive oil and sprinkle generously with salt (we used sea salt) and a grind or two of black pepper.  Cover and cook for 3 minutes.  Remove lid and sprinkle sprouts with water.  Cover and cook for 2 minutes more.  Sprouts should be just tender when pierced with a fork, and beginning to caramelize.

Remove cover and increase heat slightly.  When cut sides are well-caramelized, toss sprouts in a pan, drizzle with lemon juice, and sprinkle with more salt and pepper to taste.

Makes 6 servings.


The finished product.  Bright, beautiful green...sweet and salty/tangy.

You still might not be convinced to try them.  But trust me...this is a wonderful, inexpensive, easy-to-prepare side dish for any meal.

Lex made the Brussels sprouts again with our Christmas dinner.  Yum!!

Monday, January 2, 2012

A New Recipe for a New Year

Hi friends!  And Happy 2012!

The holiday season is over and I'm ready to make this new year a great one.  I have never been a big believer in resolutions, but I do believe that we can all focus on positive, productive things in our lives that will make us happier!  I'm going to start with a few key ideas and adjust and adapt as the year goes on.

You already know one area of my life that gives me great joy...baking.  When I really examine why I like it so much, the reasons come pouring out...the very physical nature of the act of baking...stirring a thick, sweet batter, smelling a delicious aroma, putting on soft, padded oven mitts, feeling the warmth of the oven on my face, tasting and testing...all of this makes it such a wonderful experience.

So of course I started the new year by baking an old favorite, chocolate marbled pound cake.  I can't think of too many things that remind me more of comfort and home than pound cake.  It's sweet, but not too sweet so you can eat it at any time of day with just about any beverage hot or cold.  It's substantial and satisfying.  It's easy to make, uses only a few ingredients and you can bake it in loaf or round pans. Most pound cakes taste better a day or two after baking (if you are able to resist temptation) so a longer-than- most-baked-goods shelf life is in their favor..  You can frost it, glaze it, dunk it, toast it, dust it with powdered sugar or top it with whipped cream or ice cream.  It travels well, packs easily and everyone loves it!  What's not to like?

At this point you may be asking how my positive, productive ideas led to baking a pound cake.  One of the things I'm going to focus on this year is eating fewer foods that are highly processed.  I'm going to try to eat more whole foods and more things that I've made myself instead of getting them out of a package!!  I've always used the best ingredients I can find and will continue to use organic ingredients whenever they're available.  Since I'm not about to give up sweets, I need to be sure that the ones I eat are as wholesome as possible.

I'm going to attempt to cook more and bake lots of different things this year.  Chocolate marbled pound cake is a great way to begin.


Chocolate Marbled Pound Cake

4 sticks butter softened
3 cups sugar
6 large eggs
4 cups all-purpose flour
3/4 cup milk
1 teaspoon pure vanilla extract
1/2 cup chocolate syrup

Let butter, eggs and milk rest to room temperature.  They should not be cold when you start the mixing process.

Beat softened butter at medium speed for 2 minutes.  Gradually add sugar, beating 5 to 7 minutes.

Add eggs one at a time.  I crack each one into a measuring cup and then pour it, individually, in the mixing bowl.  That way I am sure that no egg shells or rotten eggs make their way into my cake!  Mix after each addition, only until the bright yellow yolk disappears.

Add the all-purpose flour to the butter mixture alternately with milk, beginning and ending with flour.  Mix at low speed until blended.  Add vanilla.

Measure one cup of vanilla cake batter.  In a separate bowl, blend chocolate syrup with the measured one cup of vanilla cake batter and stir until blended.

Pour half of vanilla batter into a greased and floured 10 inch tube pan.  Spoon half of chocolate batter on top, gently swirl batter with knife and then tap pan on countertop.

Repeat with another layer of vanilla batter followed by chocolate batter.  Gently swirl, tap the pan on countertop and bake at 325 for 1 hour and 35 minutes or until a wooden pick inserted in the center comes our clean.

Cool in the pan on a wire rack for 10 minutes.  Remove from pan and cool completely on a wire rack.


First layer of batter in a 10-inch, buttered and floured, tube pan.


Add one-half of the chocolate batter on top.  Run a knife through it and tap the pan on the counter.
Repeat with a second layer of vanilla and chocolate batter.


Out of the oven, cooling on a wire rack for 10 minutes.


Keep it simple...a cup of hot tea and a slice of delicious pound cake.  
Now where's that book I've been meaning to read??


If you're heading back to work or getting the kids off to school, try making this cake for the week ahead. I've already sliced this one and am taking pieces to my co-workers today.  They'll be counting the minutes til break time!!  

Share my blog address with a friend so they can have this recipe!!  Much more to come.

Have a happy Monday.